| Understanding Bizexpress
Work Bench |
| |
|
What is Work Bench?
|
Work Bench is an application that allows you to add domians, configure
workflows, database, layout,Usergroup and Backoffice.
The application creates a set of dynamic web pages, databases and
other backoffice applications.
This gives a framework or a skeleton for the user, from which he/she
can customize to suite their needs.
|
|
| What
is a Domain? |
In an organization, there are various departments. Each department
is a functional unit of the Organization. This is represented as "Domain"
in Bizexpress. For example, Marketing, Production, Sales etc.
|
|
| What
is a Workflow? |
|
Every department performs certain activity. Set of activities leads
to a transaction. Collection of transaction is called a Workflow.
In Bizexpress the workflow is split into components. A component
is a unit which performs certain functionalities.
For example, the search facility that allows the user to type in
a keyword and find a product is a typical component.
|
| What
is a Database? |
|
An activity is basically getting and storing information from a
location. This information is technically called as 'Data'.
Consolidation of all the data is called as 'Database'
|
|
| What
is a Layout? |
|
Since the output of the Workbench is a set of dynamic web pages,
the data viewed by the user should be presented in
a readable format. Layout is basically howorganising the components
in the web page
|
|
| What
is UserGroup? |
|
Every employee in the company has access to the information of the
company. But the information which the employee
accesses should be justified with the reposibilities he holds. There
may be several employees falling in the same cadre, like
accounting clerks in the Accounts department. The information that
these accounting clerks access will be limited when compared to
that of a Accounts Manager.
This way of tying the data to a particular group is called Usergroup
The application contains Menubar, Toolbar, Navigate Panel and Workspace
Statusbar and Quickhelp provides information
|
| |
|
| Menubar |
 |
|
Toolbar |
 |
|
Navigate Panel |
 |
|
Workspace |
 |
|
Statusbar and Quick help |
 |
| |
|
| Getting Started |
|
After installing the Bizexpress suit, you find the WorkBench aplication
in your program files. Click to start the application.
|
| |
|
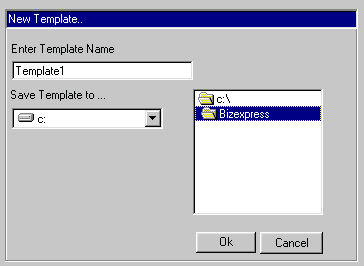
| Creating a New Template |
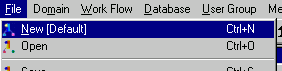
Click on the File menu and then 'New' to create a New Template. |
| |
 |
Enter the Template Name in the textbox provided. Choose the destination
path where the Template will be built. Click the 'Ok' button after
you are finished. |
 |
| |
|
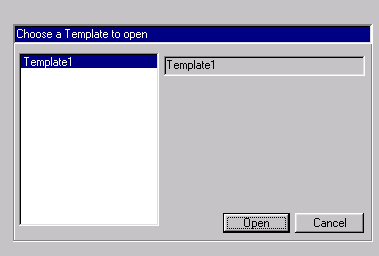
| Open an existing Template |
Click on the File menu and then 'Open' to open an existing Template.
A list box containing the Templates available is displayed. Double
click the Template you wnat to open or choose the Template and click
the 'Open' button.
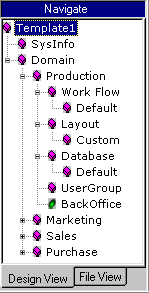
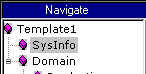
Once the Template is created you can see the Template name that you
entered on the 'Navigate' panel of the window. Double click the 'Icon'
or the Template name to expand.
|
 |
| |
|
|
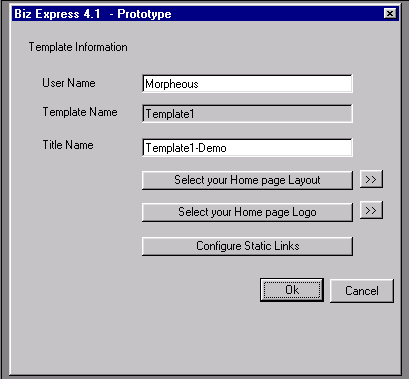
SysInfo
|
| SysInfo contains the information of the
User and the layout configurations. Click on 'Sysinfo' and get to
see the details of the 'Sysinfo' in the 'Work Space'. |
 |
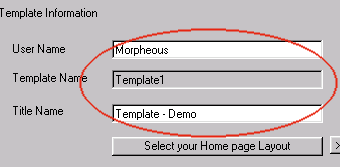
Clik on the '+' or double click on 'General' to see the tree geting
expanded showing you information needed to be supplied. Enter your
name and the 'Title Name' in the respective textboxes.
|
| |
 |
| |
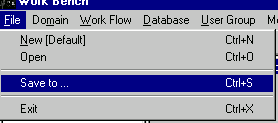
To change the destination path of the files
created by the application, click the 'File' menu and then select
'Save to' option.
|
| |
 |
| |
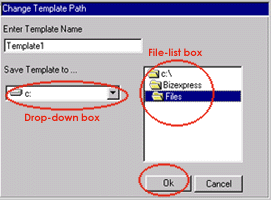
| On selecting the option, the user can click
the drop-down box and select the drive. Double click on the file list
box to change between the folders. Click 'Ok' after you are finished. |
| |
 |
| |
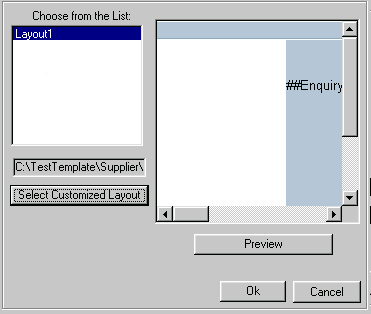
Click on the 'Select your Home Page' button
to select a layout of your choice from the listbox. You can select
your own Layout by clicking the 'Select Customized Layout' button.
|
| |
 |
| |
| After you select the layout, you can see
the preview of the Lauout on the preview area. Click on 'Preview'
button to have a full screen view. Once you are finished with the
Layout, click 'Ok' to return to the Sysinfo screen. |
| |
 |
| |
| Click on 'Select Your Home Logo' button
to select the Business Logo. |
 |
| |
The next step is to create other Links,
which you might like to add to the site. Although Bizexpress Workbench
generates dynamic web pages, there may be instances where the user
would like to have static pages like 'html' or 'swf' (flash) files
to the site. Workbench offers full flexibility to add these pages
into the site. Click on the 'Configure Static Links' button.
|
 |
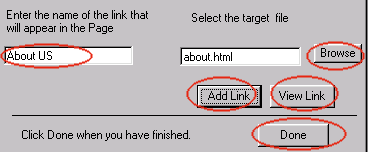
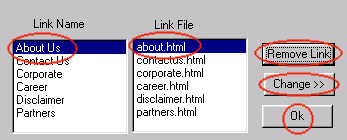
On clciking the button, a window is provided
with 2 text boxes wherein the user can add the 'Link Name' that will
appear in the 'Web Page'. Now click the 'Browse' button to select
the file to which the link will be pointed to. Clcik 'Add Link' button
to add a link.
Repeat the steps to add more links.
To view the links that has been added, click on the 'View Link' button.
|
|
To Remove an existing link, select the 'Link
Name' and the 'Link File' and then click 'Remove Link' button. Similarly
to change the name of the link or to change the file that the link
points to, select the 'Link Name' and the 'Link File' and then click
'Change Link' button.
|
 |
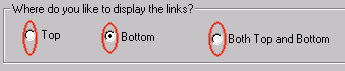
After you have finished the above steps, click 'Ok'. The Workbench
allows to configure the placement of the static links that needs to
appear on the web page. Click 'Done' button to set the placements
of Link positon. Select the option button so as to set the placement.
Click 'Ok' to save the settings.
|
 |
| |
|
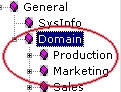
| Creating New Domains |
| |
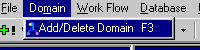
Click on the 'Domain' menu
to get the interface to add new domains.
|
|
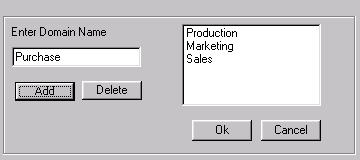
Add the Domain name in the textbox and click on the 'Add' button.
|
|
Once you click th 'Add' button, you see the Domain name added to the
Listbox.
Repeat the above step till you are finished.
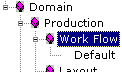
Click on the '+' next to the 'Domain' to expand. You would see all
the Domains that you have added.
|
|
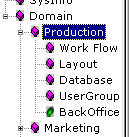
| Click on the '+' of the
domain to configure the following details. |
 |
| |
|
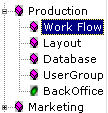
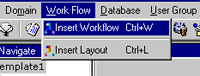
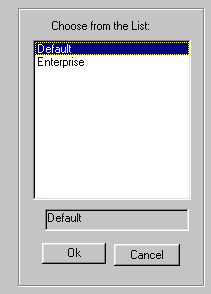
| Insert a Workflow |
Click on the 'Workflow' of the Domain. Click the 'Work Flow' menu
and select 'Insert Work Flow'.
|
 |
 |
Select from the list of Workflows available. Click 'Ok' to insert
the workflow.
|
|
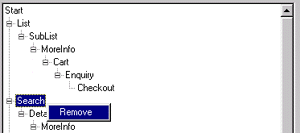
Click the '+' of the work flow, you can see the type of the work flow
inserted.
Click on the type of the workflow (for example:Default) and see the
Tree structure of the Worl Flow in the Work Space section.
Right click on the node to remove the unwanted components. You can
remove only the parent. If a parent node is remove, the children are
removed form the flow.
|
|
|
 |
| |
|
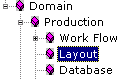
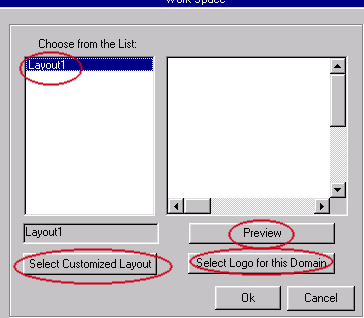
| Insert a Layout |
Every Domain needs a Layout. Click on the 'Layout' of the Domain.
Click the 'Work Flow' menu and select 'Insert layout'. |
 |
 |
Select from the list of Layouts available and click the 'Ok' button.
To select your own Layout, click on the 'Select Customized Layout'
button.
After you select the layout, you can see the preview of the Layout
on the preview area. Click on 'Preview' button to have a full screen
view.
|
|
Click on 'Select Logo for this Domain' button to select the Domain
Logo.
Once you are finished with the Layout, click 'Ok'.
Click the '+' of the Layout under the Domain and then click on the
Layout name (for example:Layout1) to see the type of the Layout inserted.
|
| |
|
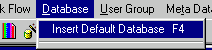
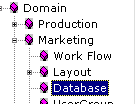
| Inserting Database |
Click the 'Database' under the Domain and then go to the menu section
and click 'Database'. Select 'Insert Database' to insert the Database
for the Domain.
|
 |
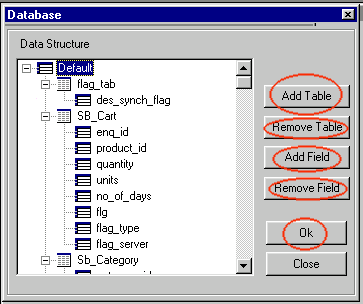
|
The default database comes with a list of Tables and Fields. You can
ad new Tables by clicking the 'Add Table' button. To remove a table,
select the table you want to remove and then click on "Remove
Table'.
Similarly select the table and click on 'Add Field' to add a new field
to the table. To remove a field from the table, select the field to
be removed an click on 'Remove Field'.
|
 |
| |
|
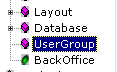
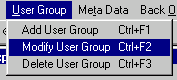
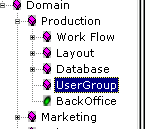
| Usergroup |
To Add User Group
|
Select the 'UserGroup' from the 'Navigate' panel. In the menu click
the 'User Group' and select 'Add User Group'.
|
 |
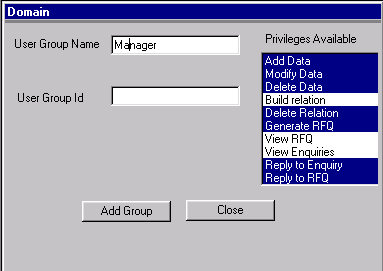
 |
Enter the name of the user group. Choose the privileges the user group
should have. And click on ‘Add Group’ to add this as a group.
Any problem encountered while performing this operation is reported
back to the user.
|
 |
To Modify a User Group
|
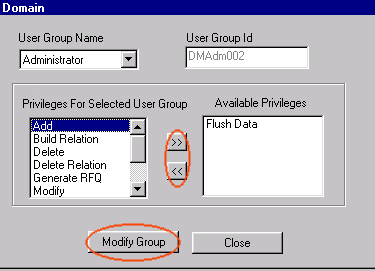
In the menu click the 'User Group' and select 'Modify User Group'
as mentioned above.Choose the user group form the list. Modify the
privileges the user group should have. And click on ‘Modify User
Group’ to modify this as a group. Any problem encountered while
performing this operation is reported back to the user.
|
 |
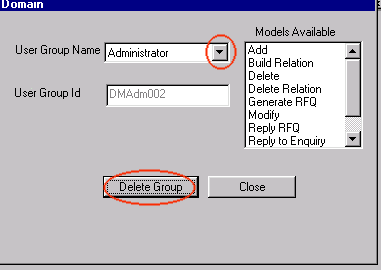
To Delete a User Group
|
In the menu click the 'User Group' and select Delete User Group '
as mentioned in the 'Add UserGroup'. Choose the user group form the
list and then click 'Delete Group' to delete a User Group.
|
|
| |
|
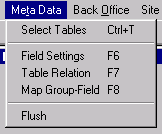
| Metadata |
Select the 'UserGroup' from the 'Navigate' panel. In the menu click
the 'Metadata'. Follow the same steps to set the metadata
for the Tables, Fields, Table Relation and Map Group-Field.
|
 |
 |
|
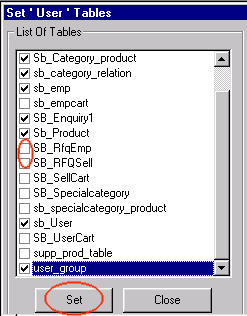
Select Tables
|
Tables defined, as 'user-tables' are the only tables that can be accessed
by the user to enter data into it.
Choose all those tables that are supposed to take in data from geds
and leave the rest unchecked, And click on 'set user tables' to set
the selected set of tables as 'user tables'.
|
|
|
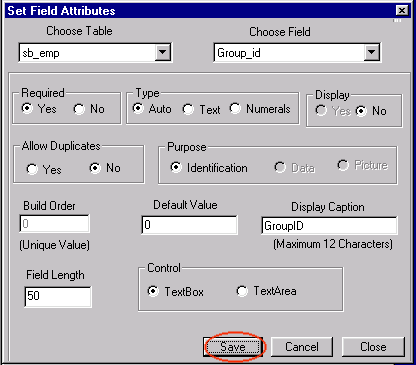
Field Settings
|
Choose the table to which the user would want to configure the field
settings.
- Choose the field.
· Is it mandatory for the field to have value in it , if yes
choose ‘yes’ else choose ‘no’.
· Does the field need to hold ids then choose ‘auto’,
if it needs to hold alphanumeric data then choose ‘text’
else choose ‘numerals’.
· Can the field allow duplicate values, if yes choose ‘yes’
else choose ‘no’.
· Does the field need to be displayed by the ‘geds’
application. If it has to display it choose ‘yes’ else choose
‘no’.
· If the purpose of the field is to generate ids and hold them
choose ‘identification, and in case it is to hold data
choose the
option ‘data’ or if the field is to hold a file
name choose ‘file’.
· Set the default value .
· The ‘build order’ is the order in which the fields
are displayed by the ‘geds’.
· Set the ‘field length’ beyond which length data
is not accepted.
· ‘display caption’ is the caption that would be
displayed by the user.
· And finally the control that would displayed by the ‘geds’
for the corresponding field. |
 |
|
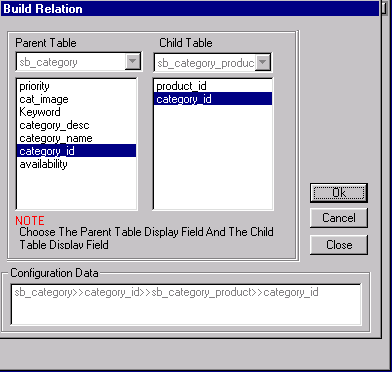
Table Relation
|
|
This screen would help you build the relation between the various
tables.
From the list of parent tables and the child tables choose the parent
& the child table
The first step is to choose the field, in the parent as well as
child table, that would be used as the display field.
The second step is to choose the field, in the parent as well as
child table, that would be used as the ‘id’ field.
At this a point a query on whether the relationship stored in the
child table or in a different table.
In case whether the data is held in a field in the child table,
then say ‘yes’ to the query shot and choose the field
that would hold the data , and click ‘ok’ again.
In case the relationship is held in a different table say ‘no’
to the query and from the list of tables choose the table that would
hold the relationship. From that table choose the parent and the
child field.
Click in affirmation to query on whether the relationship has to
be built. The relationship is built.
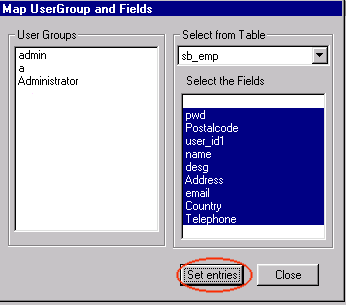
From the list of user groups choose a group .Now choose a table
and all those fields that the user group can have access to and
click on ‘set entries’.
To remove access privileges for a user group from table, choose
a table, and choose the user group, all fields to which the user
has privilege to will get highlighted. Deselect those fields that
the user group should not have access to and click on ‘set
entries’.
|
|
|
Map Group Field
|
From the list of user groups choose a group .Now choose a table and
all those fields that the user group can have access to and click
on ‘set entries’.
· To remove access privileges for a user group from table,
choose a table, and choose the user group, all fields to which the
user has privilege to will get highlighted. Deselect those fields
that the user group should not have access to and click on ‘set
entries’
|
 |
| |
|
| Configuring the Backoffice |
Insert BackOffice Tools |
In the menu click 'Back Office' and then select 'Insert BackOffice
tools'. Enter the Username and password to protect the applications
from unknown users. If you want the application to be set up in a
'multiuser' environment then check the 'Allow Multiuser-Environment'.
If you want to itegrate the Sync application with the Data entry system,
check the option 'Integrate with Data Sync'.
Note: By default this option is selected.
Enter the port number on which the server should listen. The value
should be freate than 1024. Contact your system administrator before
you fill this section.
Enter the IP address of the machine. |

|
|
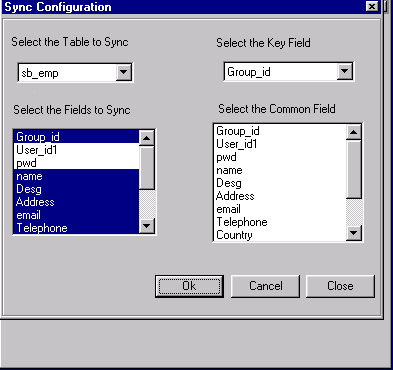
Configure Sync
|
|
Select the Table which you would like to Sync to the Server. On
selecting the table, the listbox is populated with the fields. Now
select the list of fields that will be synced with the server's
database.
Select the Key Field (For every record in the table, you need to
select a field which would identitfy a unique record).
If the Key Field cannot provide a unique record then select a common
field from the list.
Repeat the above steps for every table in the database.
|
|
|
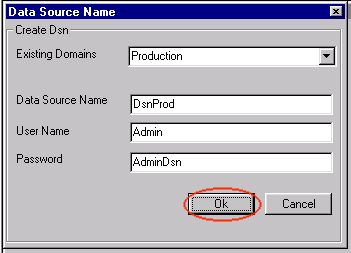
Create DSN
|
|
DSN is the Data Source Name, which allows the application to talk
to the given database. Give a unique Dsn Name.
Enter Username and Password to protect the database from anonymous
users. Click 'Ok' buton after you are done.
|
|
|
| Building the site |
Once the details for creating the site are provided , click on the
'Site Admin' menu and select 'Build Site'. Click on the 'Start' button
to build. You can see the status of the site being built. Once the
operation is over, the status bar is updated with a message 'Site
built on the location selected.
|

|
|
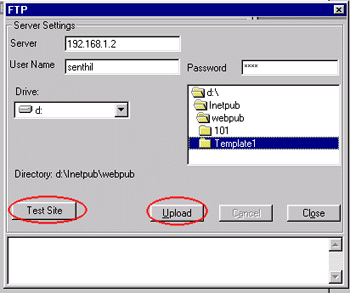
| FTP the Site to the Server |
Once the site is built under the selected destination, its time to
put the site live on to the server.
On the menu, select the Site Admin' and click 'Publish Site'. Enter
the Server Name or the IP address of the server. Give the username
and password to access the server..
Select the Drive name underwhich the folder is located. Double clcik
the folder, which is needed to be put on the server.
Now click the 'Upload' button to start the upload.
Monitor the Status of the FTP on the status bar provided.
|
 |
|
| Test the Site on the Server |
Once the site has been successfully uploaded to the server, click
on the ' Test Site' button to check whether all the applications on
the server has been correctly installed. |